Configuration > Inventory Groups
An Inventory Group is a user-defined collection of locations at a Site. The use of inventory groups enables administrators to grant users access to inventory at multiple locations at once, rather than granting access on a per-location basis.
Each Inventory Group belongs to a single Workunit (though a Workunit may own several Inventory Groups). Users at the site can be granted access to one or more Inventory Groups within the site.
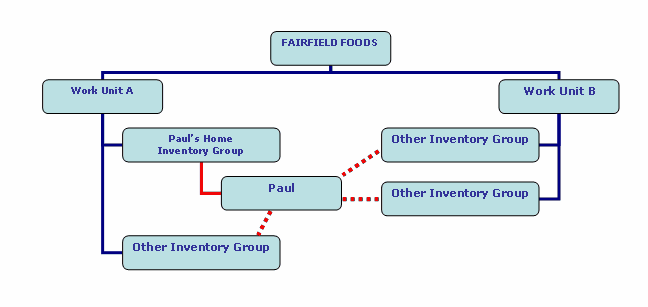
In the example above, the user Paul has access to his Home Inventory Group, which belongs to Workunit A. He can also be granted access to any other inventory group at his Site, including those belonging to Workunit B.
Configuring Inventory Groups is done in two parts: Defining the Inventory Group, and Assigning Locations to it.
Configuring Inventory Groups
| 1. | Log in as a global administrator (a user with a role that has All System Config Permission) |
| 2. | Click the System Configuration link |
| 3. | Click the Inventory Groups link |
Creating a New Inventory Group
| 1. | From the page menu, select Inventory Group > New Inventory Group |
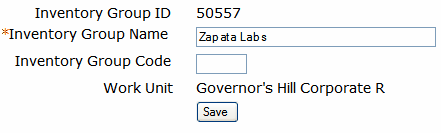
| 2. | Type an Inventory Group Name |
| 3. | Select the Workunit that is to own the new Inventory Group |
| 4. | Click Save |
Note: The Inventory Group Code is used for customized behavior barcode numbering and other information, and can be left blank.
Editing an existing Inventory Group
| 1. | Click an Inventory Group Name to edit (in the list at the left edge of the screen) |
| 2. | Make changes to the fields |
| 3. | Click Save |
Deleting an Inventory Group
When an inventory group is deleted, the Inventory Group assignment on locations within it are reset to None. Note that an Inventory Group that has users assigned to it can not be deleted, nor can one on which inventory has been received.
| 1. | Click the Inventory Group Name to be deleted |
| 2. | From the page menu, select Inventory Group > Delete This Inventory Group |
| 3. | Click OK at the Confirmation prompt |
Assigning locations to an Inventory Group
| 1. | Click the Locations link at the bottom of the Inventory Group configuration page, or navigate to the Location tree for the site (see Location Tree) |
| 2. | Select the highest level location in the hierarchy that will belong to the Inventory Group |
| 3. | Select the Inventory Group from the drop down list |
| 4. | Select the "Apply changes to child locations" check box if you want all sub-locations of this location to be included in this same Inventory Group |
| 5. | Click Save |
Note: See the explanation of Options at the end of this section.
Option |
Purpose |
|---|---|
Set Inventory Group |
The inventory group that will be assigned to the selected location |
Is Requisition Delivery Location* |
Select to make the location an option for delivery of requisition items |
Is Inter-Site Transfer Location |
Select to allow inter-site transfers from other sites to this location |
Is Home Location |
Select to make this a Home Location, to which containers may return |
Self Serve Code* |
If the location is part of a self-serve area, assigning a self-serve code causes CISPro Global to direct users here—rather than the central group—for fulfillment of requisitions |
Apply Changes to Child Locations |
Select to apply this location's inventory group and self-serve* settings to its child locations |
*Requisition Delivery and Self-Serve Code apply only to Material Qualification Module
See Also: User Inventory Group Access and Workunit Accessible Inventory Groups