Workflows > Reconciliations
Although the CISPro Global system provides excellent material tracking and inventory functionality, it can not prevent users from occasionally neglecting to record container moves, disposals, or other operations. Therefore, over time, and after repeated occasional oversights, CISPro Global's record of containers and their locations can differ from what is actually correct. The reconciliation process is designed to remedy this condition.
In CISPro Global, users can reconcile actual container locations with what is on record in the system. The reconciliation process allows the user to scan all containers in a location, and then correct discrepancies between what's found and what's expected.
Utility of Reconciliations
| • | Show which of the scanned containers were where the system expected them to be |
| • | Allow the user to move containers that are not in the right place |
| • | Allow the user to create a Missing Containers worklist of containers that were not scanned |
Create a New Reconciliation
| 1. | Click the Reconciliations link on the Home Page (or click the CISPro logo and select the Manage Inventory > Reconciliations menu item) |
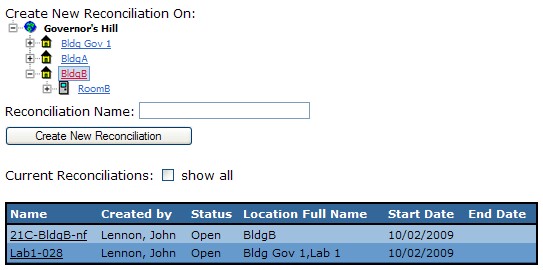
| 2. | On the main Reconciliations page, select, within the location tree, the location for which the reconciliation will be created |
| 3. | Type a name into the Reconciliation Name: edit box |
Reconciliation names must be unique.
| 4. | Click the "Create New Reconciliation" button |
The new reconciliation is displayed in the Current Reconciliations grid, along with all other current reconciliations, each with its name as a link as shown below.
Note: Because reconciliations permissions apply at the site level, any user within a site may view, modify or cancel a reconciliation created by any other user at that site.
Reconciliation Operations
Once a reconciliation has been created, clicking its reconciliation name link opens its "working page," as pictured below. From there you may perform all of the main functions associated with the reconciliation process, from taking inventory of the containers at the location you chose, to viewing the final results of the reconciliation.
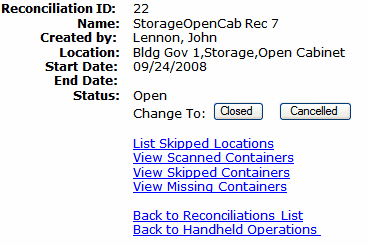
This reconciliation detail page features several links, four of which are worklists for viewing the results after scanning, one of which will return to the main reconciliations page, and one to open the Handheld Operations page.
Scanning
Scanning containers (and location codes) for a reconciliation can be performed either with a Videx or with CISProMobile on a Pocket PC. See Portable Data Terminal (Videx) or Using CISProMobile for detailed scanning instructions.
| 1. | Click the Back to Handheld Operations link |
| 2. | If using a Videx, select the Reconcile Container Locations program and click the Program Videx for Operation button |
| 3. | Scan the barcode of the reconciliation's top-level location or a location beneath it |
| 4. | Scan all containers found within that location |
| 5. | Repeat steps 3 and 4 for other locations within the location for which the reconciliation was created |
| 6. | Upload the data |
| 7. | Select the appropriate reconciliation from the 'Add scan to reconciliation' drop-down list, and click Save (the Save and Cancel buttons become inactive momentarily until the scans are added to the selected reconciliation) If scanned reconciliation data is uploaded but a reconciliation has not been opened, CISPro Global prompts the user to create a new reconciliation for the scanned data. |
| 8. | Click the Continue link to return to the reconciliation detail page |
An Example
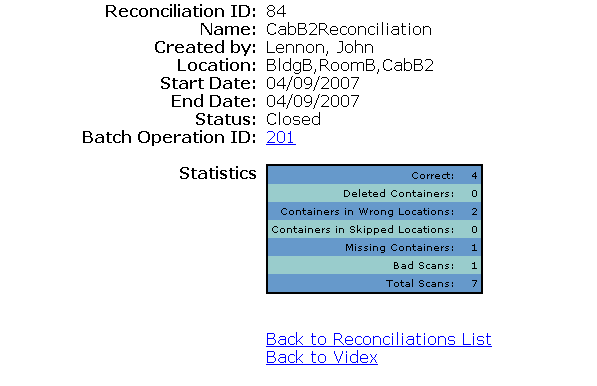
In the reconciliation used to generate the screen capture shown below, a reconciliation was created on the BldgB,RoomB,CabB2 location. Seven out of eight containers were scanned:
Correct Location 4 were expected at this location, and show a state of 'Correct' in the Scanned Containers Worklist screen capture below*
Wrong Location 2 were valid containers that were not expected at this location, and appear with a state of 'Wrong Location'
Bad Scan 1 was an invalid container barcode, and shows a state of 'Bad Scan'
Missing There was 1 more container expected at this location, but it was not scanned. This last container will appear on the Missing Containers Worklist shown later.
*A Correct Location is any location within the location being reconciled. That is, if a container is expected to be in a room, but is scanned instead inside of a cabinet within the room, its location is considered correct.
Reconciliation Worklists
The four links directly below the Closed and Canceled buttons offer access to a set of four worklist links that can be used to view the results of the reconciliation itself, and to specify how to handle any discrepancies that are detected.
| • | The List Skipped Locations worklist lists any locations within the reconciliation location that were not scanned. For example, if a reconciliation is performed on BldgA,RoomA, and there are two cabinets (CabA and CabB) in BldgA,RoomA, and John scans only the containers in CabA, the worklist will show both BldgA,RoomA and BldgA,RoomA,CabB as skipped locations, because neither was scanned. (Note that a location must have at least one container in it to be listed as a skipped location.) |
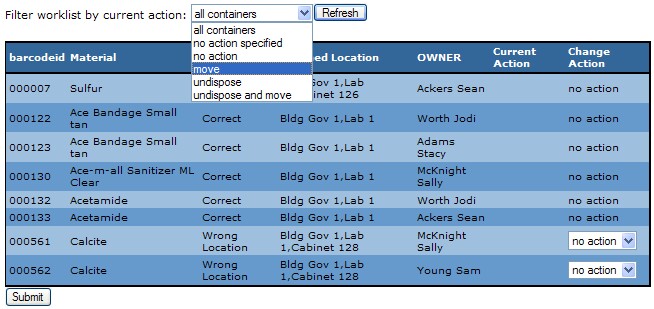
As their titles indicate, the other three worklists display containers. The "Change Action" column contains a drop-down list in each row. These are used to select the desired "actions" for each container. When the Submit button is clicked, these "instructions" are transferred into the Current Action column, which determines what will actually happen to each container when the reconciliation is closed.
Note that each of the Container worklists has a "Filter worklist by current action:" drop-down list above the grid. This tool is used to display subsets of the containers in that worklist, and is particularly useful for identifying the "new" containers—those that have no current action assigned to them yet and display when the "no action specified" option is selected from the filter menu.
| • | The View Skipped Containers worklist, following from the List Skipped Locations worklist described above, displays all containers in the skipped locations. |
| • | The View Scanned Containers worklist displays the list of the container barcodes you scanned, and shows whether their scanned locations coincide with CISPro Global's stored record of where containers actually are. If there is agreement, they are listed with a state of "Correct." If not, their state may be "Wrong Location" (they are in the system but in a location different from the scanned location), "Disposed" (they did exist but have been disposed), or "Bad Scan" (this is an invalid barcode or there is no record of this barcode in the system at all). |
There is a Change Action drop down list in any row where the state is not "Correct." In this example, containers 008140 and 008143 are in a different building. The "move" action will move the 008140 container to the scanned location: BldgB,RoomB,CabB2. Also, the 223344 barcode is shown as a Bad Scan, meaning there is no record of its existence in CISPro Global.
'Undisposing' Scanned Containers
If a reconciliation scan includes a container whose state is 'Disposed,' the container can be 'Undisposed' (undeleted) in one of two ways, depending on its location status during Reconciliation.
| • | If a container whose state is 'Disposed' is in the right location, the user can select 'no action' or 'undispose.' |
| • | If a container whose state is 'Disposed' is in the wrong location, the user can select 'no action,' 'undispose,' or 'undispose and move,' the last of which will undispose the container and move it to the scanned location. |
| • | The View Missing Containers worklist lists the containers expected in the location of the reconciliation, but not included in the scan. For each container on the list, you can choose "mark missing," "dispose," or "no action" from the Change Action drop down list. In the screen capture shown below, the 008153 container was expected at the reconciliation location, but was not scanned. |

What does 'Missing' mean?
When a user scans a location barcode, CISPro Global will always analyze the entire set of scanned data from the handheld scanner and find the deepest location in the hierarchy that was scanned. It will then assume that any containers within that location should either be found (scanned), or missing (not scanned). After a container is marked as "missing," it is displayed on the Missing Containers at Site worklist, one of the materials worklists. For this reason, when doing a real scan for reconciliation purposes, the user should scan the highest location in the hierarchy he intends to process.
Viewing Missing Containers When a container is marked missing as a result of a reconciliation on the location where it is expected, it does not display on the material containers tab unless the container tab filter is set to 'Missing Containers.' Also, on the container information page for a missing container, its location displays in red, to indicate that the container should be in that location but is not.
Removing the Missing Flag When a container that was marked 'Missing' as a result of one reconciliation is subsequently scanned in another reconciliation, its 'Missing' flag is cleared.
Closing the Reconciliation
After you are finished reviewing the worklists, close the reconciliation by clicking the Closed button. When the status of the reconciliation changes to "Closed," the page is displayed differently, showing, among other things, a summary table called 'Statistics.' If any Change Actions (e.g., Move, Mark Missing, etc.) were submitted on any of the worklists, this page will also display a Batch Operation ID link below the Status.
Batch Operation Processing
Unlike most other operations that users perform on containers in CISPro Global, the Change Actions submitted on reconciliation worklists do not process immediately. The list of submitted changes constitutes a sort of "to do" list of actions that will be executed all at once by the system in "batch" mode.
See the Batch Operations topic for more information on performing groups of tasks that have been stored, often through a Handheld Operation.
Check the Results of the Reconciliation
These are the steps to process the Change Actions that are the outcome of this reconciliation:
| 1. | Close the reconciliation, as described above |
| 2. | Click the Batch Operation ID number to open the View Batch Operations page. The state of the reconciliation displays as "Pending" |
| 3. | Wait until the pending operation has been processed (this should happen automatically). |
| 4. | Refresh your browser window if necessary. The state of the reconciliation on the View Batch Operations page will have gone from Pending to Complete. |