Workflows > Receiving
In CISPro Global, receiving is creating containers. Containers are created either through a receipt process or a dispense process. When containers are created as a result of a receipt, they are assigned to a lot. Lots embody information common to a group of containers received together, and enable the user to perform actions on multiple containers at once.
For a material to be received, it must have at least one package and size record. Package and size records can be created as part of the receipt process when necessary. Once the package/size setup has been done, users can receive materials by re-using this setup.
About Basic Receipts
| • | Can be performed from the Home Page, or from the Material Containers tab |
| • | One receipt produces one receipt lot |
| • | Containers are always Lab Use Only |
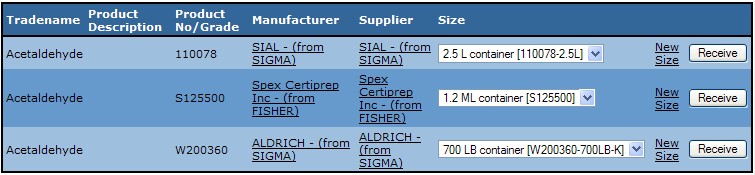
Receive a Basic Material
| 1. | Login as a user with Receiving Basic Containers permission |
| 2. | Click the Receive Material link on the home page |
| 3. | Type all or part of a material name (or other search criteria) and click Search |
| 4. | Click on a material name link in the results to receive the material |
| 5. | Select an option from the Size drop-down list on one of the packages, and click the Receive button to display the Receive Material page |
Note: If there is no record for the size being received, click the New Size link to create a new size on the selected package.
| 6. | Enter the number of containers to receive and, if necessary, the Net Quantity per container |
User-Defined Barcodes; If the userbarcodes configuration variable is set to '1,' the user will be prompted here for a list of barcodes. The 'number of containers' setting on the receipt screen that follows is based on the number of lines in this barcode set.
If the seedisposeddupes configuration variable is set to '1,' CISPro Global warns the user of any barcodes that are already assigned to disposed containers.
| 7. | Make any necessary changes to the receipt details (see Receipt Settings below) |
| 8. | Click the Submit button to create the containers and view the Receipt Status page, which displays the number of containers created, as well as the Lot number to which they belong (see Lots for more information) |
Selecting Locations, Inventory Groups, and Owners on a Receipt
The options for locations, inventory groups, and owners on the receiving page are dependent on each other, on the user performing the receipt, and on some configuration settings.
Owner/Inventory Group/Location Dependencies The locations that are available for receiving are dependent on inventory group selection, which in turn is dependent on owner selection. The primary factor that controls which inventory groups (and therefore which locations) are available for selection on the receiving page is the receiving user's inventory group rights.
When a user is selected from the Owner list on the receiving page, an inventory group and location are automatically selected as follows:
Only inventory groups to which the receiving user has modify rights appear on the receiving page.
If the receiver has modify rights to the selected user's (that is, the Owner's) home inventory group, then that inventory group and the Owner's default location are automatically selected.
If the receiver does not have modify rights to the selected Owner's home inventory group, then the receiver's home inventory group and default location are selected. The inventory group and location can be changed. In this case, when the inventory group is changed, Location is set to the first in the list of locations that belong to the selected inventory group. The receiver can then select a different location belonging to the selected inventory group.
(See User Access to Inventory Groups for more.)
Receiving to Locations at Other Sites If the intersite_defloc configuration variable is set to 1, off-site receiving locations can be selected. The Location list includes off-site locations those belonging to inventory groups to which the receiver has modify access.
Location Picklist Options The locations into which containers can be received are displayed either as a single list of concatenated location paths (like BldgA,RoomA,CabA), or as Cascading Locations, in which case the option selected in the list for one location level determines the options shown in lists for lower levels.
For example, selecting BldgA from the building-level list would cause only rooms within BldgA to be displayed in the room-level list. Selecting RoomA from the room-level list would limit the cabinet-level list to cabinets inside of RoomA, and so on.
With Cascading Locations enabled, users with many locations can select a receipt location without scrolling through a long list. (See the rec_loc_pick Configuration Variable, in Configuration.)
Receipt Settings
Options available on the Receive Material page.
Basic Receipt Settings |
|
|---|---|
Label Name |
The user can choose from the list of synonyms for the material being received. The selected name will be available for printing on labels. |
Manufacturer Lot# |
The manufacturer's lot# is stored with each container in the receipt. |
Owner |
Select the user who is to own the containers. Inventory Group options are based on Owner selection. Owner list includes all users at receiver's site. |
Status |
If the show_cust_contstatus configuration variable = 1, the status picklist (including custom status options) is visible on the receiving page. |
Search Last Name |
Search for a user to make to owner of the lot's containers. Search results will populate the Owner drop-down list. |
Inventory Group |
Inventory Group to which the lot will belong. Receipt Location options are based on Inventory Group selection. |
Location |
The location into which the containers are being received. Location options are dependent on Inventory Group selection, which itself is dependent on Owner selection. |
Expiration |
The expiration date of the containers |
Notes |
Container notes |
MSDS Upload |
Create a new MSDS for the selected material and manufacturer. |
# of Containers |
Number of containers being received |
Net Amount/Container |
The initial net quantity for each container received |
Certificate of Analysis |
User can upload a Certificate of Analysis document file to the receipt lot. |
More Lines... |
The user can add more line items of the same material, for example when the received containers' weights or volumes vary. |
Weigh button |
Used to read from an electronic balance connected to the user's workstation. |
Post-Receipt Options
The Receipt Status page displays the following options once containers have been received.
Label Printing Once the containers have been received, CISPro Global will allow the user to choose a container identity label layout to print. Each Work Unit must be configured to use receiving labels. There can be different label layouts for basic receipts. The user must have a label printer connected to the workstation to print labels.
Viewing containers Once the receipt has been completed, the user can view the containers that were created by clicking the Containers link to switch to the Containers tab.
View Receipt Lot View the details for the receipt lot created for the current receipt. From the Receipt Lot Details page, the user can add a Certificate of Analysis, batch edit containers, add lot properties, and perform other lot-related tasks.
Properties Lot Properties and Container Properties that have the Allow Batch Entry setting can be applied on the Receipt Status page.
Batch Entry of Properties
| 1. | Click the plus sign to show available properties |
| 2. | For each property to be assigned at receipt, select the check box and either type or select values as applicable |
CISPro Global uses the Receipt Lot to store attributes for containers created in a single receipt.
Receipt lots allow multiple containers to be managed as a group. Their expiration dates are synchronized. The set of containers that is considered the receipt lot may change over time as containers are dispensed and deleted. When containers are moved out of the inventory group into which they were received, their expiration dates are not kept synchronized with the lot.
Expiration Date and Status Changing the expiration date of a basic lot to a date in the future changes the lot status to 'Lab Use Only.' Changing the date of a Lab Use Only lot to the past changes the lot's status to Expired.
Base Receipt Lot Number on First Barcode There is an option to use the first barcode in a group of received containers as the basis of the receipt lot number. It is enabled via the 'usebarcodeaslotno' configuration variable. Consult your administrator for help.
Batch Editing Container Records As all containers created during a receipt are assigned to a single lot, many of their attributes can be changed at the lot, or batch, level. See Batch Edit Containers for more information.
Lot Permissions Access to receipt lots is controlled by the lots_nongmp View/Create/Modify/Delete permissions. These permissions supersede inventory group restrictions.
Lot's Inventory Group A Receipt lot's Inventory Group is the same as the Inventory Group of the location into which it was received. Note that this is not necessarily the same as the location of its containers, as the two are changed independently of each other.