Reference > Handheld Data Collection > Portable Data Terminal (Videx)
CISPro Global supports the collection of data at multiple locations using the Laser Lite Pro portable data terminal from Videx (commonly referred to as the Videx). Using the Videx, a user can scan barcodes for containers (and users, locations, etc.) at many locations, and then upload all of the data to the database in one step.
The Videx Scanning Process
Use of the Videx consists of several basic steps, which can vary depending on the particular operation being performed, but the basic process is:
| 1. | Open the Videx Operations page* |
| a. | Click the CISPro menu icon (located at the top left of every page) |
| b. | Select Tools | Handheld |
| 2. | Select a program (or operation) from the list |
| 3. | Click the Program Videx For Operations button to download it to the Videx handheld scanner |
| 4. | Perform scans for the selected operation according to its instructions in Videx Operations (below) |
| 5. | Return the handheld to the base and upload the data according to the instructions in Uploading Data Collected with the Videx (below) |
The data saved to the Videx during the scanning process is not recorded in the database until the user re-docks the Videx. Therefore, it is important that Videx users maintain a regular schedule for updating the database, otherwise operations performed on the Videx by one user may either become out of date with changes by other users of the system, or be lost when another user programs the Videx for use in another scan.
Videx Operations
There are several programs (or operations) available for use with the Videx. An operation must be downloaded to the Videx before any scanning is done, so that the Videx gives the user the correct prompts and processes the scanned information correctly. The Videx operations are explained below.
1. Change Container Location (move), Owner, Owner+Location (Transfer), or Dispose
The Change Container Location, Transfer Container Ownership, and Dispose of Containers operations are consolidated into a single, multi-mode Videx operation. Because there are four operations in one program, the user must scan the keyword to prepare the Videx for the specific operation that is being performed.
The 4 valid keywords for the multi-mode operation are: MOVE, OWNER, TRANSFER, and DISPOSE. Subsequent steps in the operation depend on which keyword is scanned initially. The steps for each operation are shown below.
Change Container Locations
| 1. | Scan the word MOVE |
| 2. | Scan a location ID barcode (begins with LS) |
| 3. | Scan container barcodes |
The user can scan another location at any time. A container is moved to whatever location is last scanned before the container barcode, except where the move is prohibited (the user is assumed to have permission to move any container whose barcode is scanned, unless the container belongs to a material that is local to a different site, in which case the move is prevented). The ownership of the container does not change in a move operation.
Note on Project Codes: If the Project Ownership module is in use, the user is prompted for a Project Code after each container scan. When no project code (or an invalid project code) is entered, the project is set to [None].
Change Container Ownership
| 1. | Scan the word OWNER |
| 2. | Scan a user barcode (beginning with U) |
| 3. | Scan one or more containers |
All scanned containers will be owned by the scanned user. The container's location will not change.
Transfer Container Ownership
| 1. | Scan the word TRANSFER |
| 2. | Scan a user barcode (beginning with U) |
| 3. | Scan one or more containers |
Ownership of all scanned containers will be transferred to the scanned user and moved to his or her default location.
Dispose of Containers
| 1. | Scan the word DISPOSE |
| 2. | Scan any number of container barcodes |
All scanned containers are marked as disposed.
1a. Change Container Location (move), Owner, Owner+Location (Transfer), or Dispose (with disposal codes)
This program is identical to number 1, except that dispose operations have the added step of a dispose code scan. So the Dispose operation works like this:
Dispose of Containers
| 1. | Scan the word DISPOSE |
| 2. | Scan a container barcode |
| 3. | Scan a Disposal Code (or press the ENT key to accept a default code) |
| 4. | Repeat steps 2 and 3 for additional containers |
All scanned containers are marked as disposed, with disposal codes recorded in CISPro Global.
2. Assign Containers to Groups - the user scans a Container Group ID (beginning with G), then any number of container barcodes. Assigning containers to a group enables you to perform actions on all the containers in that group simply by referencing the group ID.
| 1. | Open the Videx Operations page* |
| 2. | Select the Assign Containers to Container Groups program from the list |
| 3. | Click the Program Videx For Operations button |
| 4. | Scan a container group barcode |
| 5. | Scan the barcodes of containers that should be assigned to the group |
| 6. | Proceed to Uploading Data Collected with the Videx |
3. Reconcile Container Locations - The user scans a location code and then an inventory of the container barcodes residing at that location. The purpose of this operation is to find out whether the containers that are actually located at a particular location match the list of containers that the system thinks are located there. Unlike all of the prior choices, this operation does not automatically update the database when the user docks the Videx and clicks Update Database. Instead, it displays a preview of the changes and asks the user how to proceed. The basic scanning instructions are provided here. Refer to the Reconciliations topic for more information.
| 1. | Open the Videx Operations page* |
| 2. | Select the Reconcile Container Locations program from the list |
| 3. | Click the Program Videx For Operations button |
| 4. | Scan a Location barcode |
| 5. | Scan one or more container barcodes |
| 6. | Proceed to Uploading Data Collected with the Videx |
4. Fire Reporting Container Setup - There are a few preliminary steps to be performed by a system administrator before this program is used. Control Areas must be configured for your site, with containers of the relevant materials at the designated locations. Also, the materials themselves must have the proper Fire Reporting information (Hazard Category, Hazard Class, etc.) associated with them.
The Fire Reporting Container Setup program enables you to scan the desired Use Type, Storage Pressure, and Atmospheric Pressure settings, then scan the container barcodes to which these settings are to be applied. In this manner, you can assign the appropriate settings to a large number of containers at one time. For your convenience, there are links on the Handheld Operations page that you can use to print out barcodes for the various pressure, temperature and use type settings.
Uploading Data Collected with the Videx
Once the scanning for a Videx operation is completed, the data stored in the handheld scanner must be uploaded to the CISPro Global database. There are several optional features, which are described under Videx Options.
Upload Collected Data
| 1. | Return the Videx to its dock |
| 2. | On the Videx Operations page, click the ‘here’ link in ‘Click here only after you have completed scanning’ |
| 3. | Clear the Preview Data First check box (if previewing data, see Previewing Videx Data) |
| 4. | Click the Get Videx Data and Update Database button |
The page will display a batch operation number and a link, like Videx operation will be processed as batch operation 221, where the words "batch operation 221" are a link that will display the batch details.
Viewing Batch Operations The list of Videx batch operations can be viewed at any time via the Batch Operations link on the System Configuration page. Users with the system permission see all batch operations, with the option to filter to their own sites. Users without the system permission see only their own operations.
Videx Options
There are several optional Videx functions.
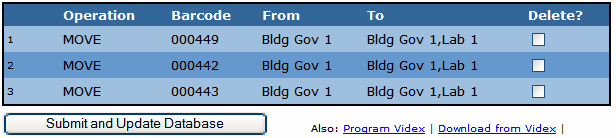
Previewing Videx Data
The data upload process features an optional preview, which allows the user to view the data before the update, and see whether there are bad scans or other unwanted data. The user can delete unwanted data before it is added. To use the preview when uploading data:
| 1. | Return the Videx to its dock |
| 2. | On the Videx Operations page,* click the ‘here’ link in ‘Click here only after you have completed scanning’ |
| 3. | Select the Preview Data First check box |
The Preview Data First check box is ignored on reconciliations. Regardless of whether this check box is selected, when the Get Videx Data and Update Database button is clicked during a reconciliation, the preview step is bypassed.
| 4. | Click the Get Videx Data and Update Database button |
| 5. | On the Videx Data Preview page, select the Delete check box for any data rows that should not be submitted |
| 6. | Click the Submit and Update Database button to complete the upload |
The page displays a batch operation number and a link, like "Videx operation will be processed as batch operation 221," where the words "batch operation 221" are a link to the batch details.
Printing Location Labels
To print a location label for a videx operation, click the Print Location Label link at the bottom of the Videx page.
Print a Location Label
| 1. | From the Videx screen, click the Print Location Label link |
| 2. | Select the Location from the tree by clicking it |
| 3. | Click the Print button Note: The user must have access to a label printer from the workstation. |
Videx Recommendations and Troubleshooting
Consider the following additional information when using the Videx portable data terminal.
Videx Control Panel
An expanded set of Videx controls can be displayed on the Videx page, allowing the user to upload programs, download data, change COM ports, and clear memory.
| 1. | Open the Videx Handheld Operations page |
| 2. | Click the Configure link to view the control panel |
Battery Life
Adequately charged batteries are essential to the proper operation of the Videx. When the Videx is used with weak batteries, the results are unreliable.
Check Battery Strength
| 1. | Open the Videx Handheld Operations page |
| 2. | Select the Change Container Location (move), Owner, Owner+Location (Transfer), or Dispose program from the list |
| 3. | Click the Program Videx For Operations button |
| 4. | Remove the Videx from the dock and press the ESC key |
| 5. | Press the BAT key |
If the Videx displays a voltage reading of less than 5.00, replace the batteries (or recharge them if they're rechargeable).
The Videx has internal batteries that are good for several hours of scanning. It can be loaded with rechargeable NiCad batteries and left in the cradle (which can also serve as a charger) when not in use. If the Videx battery gets low during use, the Videx will notify the user. The data will not be lost unless the Videx is left unattended for an extended period (days) . It is possible to put the Videx back in the cradle to charge it, and then update the database from the data that resides in the Videx. It is recommended that the Videx be regularly cradled and the database updated so that there is no need to wait for charging.
Warning: Do not set the Charge switch on the LaserLite Pro base station to 'on' if you have not placed rechargeable batteries into the LaserLite Pro! Doing so may cause non-rechargeable batteries to explode or leak, damaging your LaserLite Pro. (Note: The Priority Support Contract does not cover damage to the LaserLite Pro that is due to misuse of the recharge function).
Reinstalling Videx
If videx operations are failing, in Internet Explorer, it may be necessary to reinstall the Videx. Reinstall the Videx as follows:
| 1. | In Internet Explorer, select Tools > Internet Options |
| 2. | Select the General Tab |
| 3. | Click the Settings button |
| 4. | Click the View Objects button |
| 5. | Right-click the CswRibmX Control and click Remove |
| 6. | Close the browser and any other open browser windows |
| 7. | Open the browser and re-try the operation |
Intelligent Handling of Conflicting Scans
The system will intelligently apply changes that are contradictory. For example, if a user disposes of a container, disposing of it again will not cause a problem. If the user scans the same container from several locations, the last location will go into effect.
Usage Tips
To switch between numbers and letters on the keypad, use the SHIFT key. This key "locks" until you press it again. There is an indicator light to show that the keypad is currently shifted.
It is not necessary to use the exact same cradle for programming and updating the database. Any Videx cradle connected to a CISPro Global workstation with a serial cable will work.
*While the handheldconfig configuration variable is set to both, Videx Operations is one of two tabs on the Handheld Operations page.