Workflows > Materials
This section addresses the creation, merging, and removal of materials in CISPro Global. In the material creation section here, only the initial creation of the material record itself is discussed; the secondary steps, such as specifying hazard information and receiving containers of a material, are discussed at length in separate sections. Some of the secondary steps in the material creation workflow are referenced via links in this section.
Materials are the general elements around which the CISPro Global database is formed. The term 'material' is used to describe chemicals, biological entities, supplies, and pieces of equipment, as well as the fundamental constituents from which finished products are constructed.
Materials Topics
The other sections in this chapter discuss different aspects of the use and attributes of materials.
The Material Creation Workflow
The first step in adding a new material to CISPro Global is defining the material. The initial material definition step is a simple process, consisting of specifying a type, class, name and, for chemicals and constituents, a physical state. After the material is defined, its other attributes can be specified, and it can be configured for receipt.
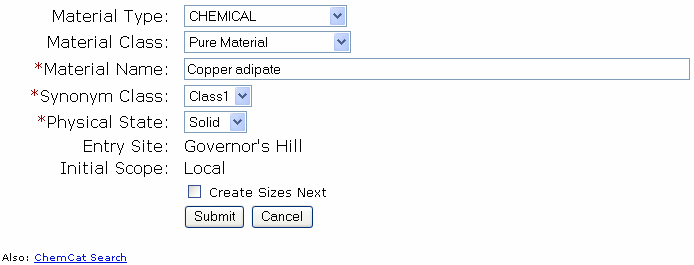
In the image shown below, a new chemical (Copper adipate) is being introduced into the system. After the material record is created, the user can specify the chemical's formula, its hazardous properties, any personal protection equipment (PPE) that should be used when handling it, etc. If the Create Sizes Next box is selected (see instructions below), the user can proceed directly to the package creation and receiving process for the new material.
Creating a New Material
| 1. | From the Materials section of the Home Page (or the Material menu item on the Main Identity page), click the Create New link |
| 2. | Select a Material Type |
| 3. | Select a Material Class |
| 4. | Select a Synonym Class |
| 5. | Enter a name for the new material |
| 6. | If the Material Type is Chemical or Constituent, select a Physical State (the Physical State option is not visible for other material types) |
| 7. | To proceed directly to package creation (instead of the Material Identity view) after creating the material record, select the Create Sizes Next check box |
| 8. | Click Submit |

More Material Add/Edit Options
After the material record is created, there are several next steps from which the user is likely to choose. The order in which these steps are taken depends on the user's preferences an needs. Here are some likely post-creation material workflows, and some links to more information.
Receive Materials:
To receive containers of a material, the user must first create manufacturer- or supplier-specific records, which are referred to as Packages. Once the material and package are defined, click the Receive menu item at the top of the screen and select 'Receive currently viewed material' to go to the receiving page. (See the Receiving topic for more detailed information).
Tip! To go straight to the package defining process, select the Create Sizes Next check box (steps 7 in the instructions shown earlier) when creating a material.
Edit Material Details:
After creating the material, the user is taken to what's called the Material View, where the material tabs are displayed, with the Identity tab selected. See Material View for a discussion of what information is presented on each of these tabs.
Create More Materials:
To create additional materials, and postpone receiving containers and adding more material details until after several materials are created, follow the Creating a New Material steps provided earlier, skipping step 6 each time.
Export a Material Record
Materials have an Export link at the bottom of the Identity tab. Clicking this link causes the material to be exported in Microsoft Excel format. System administrators can customize what data is exported by editing the S4 "exportmaterial."
While the material displays on the main Identity tab, click the Material link at the top of the page and select Delete. A confirmation box will appear: "Delete this material and all related data, including containers?" Because a material may have documents, properties, structures, standards, containers and all sorts of other logical items attached to it, the CISPro Global system must make a recursive pass through the data tables and delete everything connected to it—this is known as a "cascade" delete.
Caution: Because this process cannot be reversed, and deletes much more than just the name of the material, be very sure before trying this.
See Also: