|
Workflows > CISPro MobileWeb > Receive Material
CISPro MobileWeb enables users to receive catalog items that already exist in the materials database or, if a match is not found in the database, import a catalog item from ChemCat and then receive against it.
The receiving process begins with a catalog number or product number search. The search is first run against existing CISPro Global materials, and matching results are displayed. If no matches are found, a search is run against ChemCat, and matching results are displayed, each with an Import button. If matching catalog items within existing CISPro Global materials are located and displayed, a Search ChemCat button is also displayed, to be used in case the item to be received is not among the internal results. All receipts are performed on catalog numbers.
| 1. | On the home page, click Receive Material |
| 2. | On the Receive: Find Material page, do one of the following: |
| • | Enter the first 3 or more characters of a catalog number, and click Find Catalog# |
| • | Enter the first 3 or more characters of a product number, and click Find Product# |
| 3. | Select a Catalog Item for Import. Depending on the search criteria and the contents of the CISPro Global materials database, choosing a catalog item to receive will require one of the following sets of steps: |
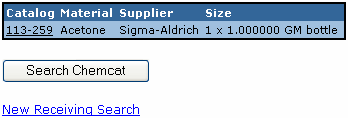
| • | If existing CISPro Global catalog items are displayed, and the catalog item to be received is listed among them: |
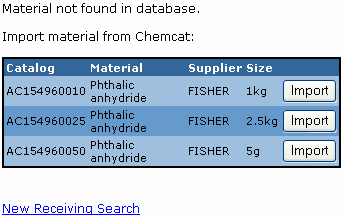
| • | If no existing CISPro Global catalog item results are found, but the item to be received is among the matches found in ChemCat: |
| 1. | Click the item's Import button |
| 2. | Click the imported item's catalog link |
| • | If existing CISPro Global catalog items are displayed, but the catalog item to be received is not listed among them: |
| 1. | Click the Search ChemCat button |
| 2. | Locate the item to be received within the ChemCat search results, and click its Import button |
| 3. | Click the imported item's catalog link |
| 4. | On the Receive: Enter Barcodes page, scan the barcode of each container being received |
| 5. | When all containers have been scanned, click Submit |
| 6. | On the Receive: Specify Quantity page, select the inventory group and location to which the receipt is being made |
| 7. | Enter the expiration date for the containers, if it's different from the default date |
| 8. | Select the containers' owner from the list |
| 9. | Enter the per-container quantity |
After the receipt is complete, the containers page displays all containers for the received material.
|